We all know that a light can either make or break a portrait. In today’s video I am going to talk of 5 types of lighting that make a portrait. And I will be using one single light to achieve this.
There can be more than these 5 but we would go ahead with these 5.
The best way to talk about the positioning of lighting is probably by the hours of the clock. So for todays video I am going to be at 6 o clock and subject at the centre, ie, between 12 and 6 o clock.
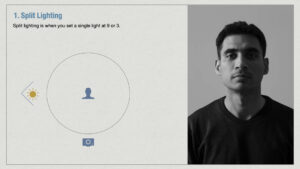
- Split lighting
Split lighting is achieved when we set the light at 9 or 3 o’clock.
How you recognise this light? You can easily recognise split lighting in an image by half of the subject being lit and the other half in the shadows. The shadows can clearly and deeply seen straight on the made starting from forehead, nose and to chin.
Use: Split lighting tends to make our subject look tough and masculine so I would recommend you to really consider your subject when choosing this type of lighting.
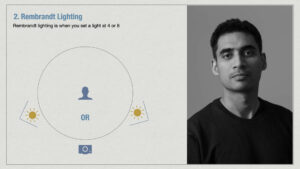
2. Rembrandt lighting
We achieve this lighting when the light is closer to 4 or 8 o’clock
It is named after the Dutch painter who likely to pose people near a window and then paint.
How you recognise this light?
One side of the face is well lit and on the other side we see a shadow from the subject’s nose that extends to the shadow of their cheek. Because of this there is area that pops out creating an upside-down triangle-shaped light under their eye opposite the main light. This becomes a distinctive feature of Rembrandt lighting.
Use: This type of lighting is very popular among photographers which gives a kind of desirable moodiness to the picture. Though this lighting is very popular but it might not go well with all the faces.
Rembrandt light can be further extended to two more kinds of lighting:
a. Broad light
When we move our subject from Rembrandt towards light source and position our camera facing the subject, this light is achieved. This is a side angle pose, where the most well lit side of the face is close to the camera.
Use: This type of light can make a face look fuller so it’s ideal for those who have very narrow & thin faces.
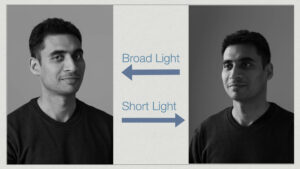
b. Short light
Short light is just the opposite of Broad light. Here the shadowy part of the face covers more area and is closer to the camera.
Use: This type of light works well on a broader or fuller face and is flattering on most people.
3. Butterfly or Paramount lighting
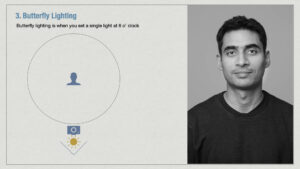
This is when you boom a light at 6 o’clock slightly above and in front of your model.
How you recognise this light? This type of light accentuates the eyes and face. This light places highlights on the cheeks and a shadow under the nose of the model that resembles a butterfly. Its important to place the right angle of the light at level where the catch lights are well captured without losing the soft shadow underneath cheekbones or nose.
Use: It a go-to beauty light which is very popular among females. In fact is so famous that one of popular actress had this in her contract that she can only be photographed in Butterfly light.
4. Clamshell
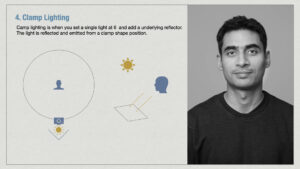
Clamshell lighting is an extension of Butterfly or Paramount light. Here, an additional light with less intensity or a reflector is placed at 6 o clock under the chin of the model. This will result in softer shadow under and Chin and nose and will bring our interesting catch light in the eye.
If you imagine seeing this set up from the side, and you will see the shape of an open clamshell.
5. Loop lighting
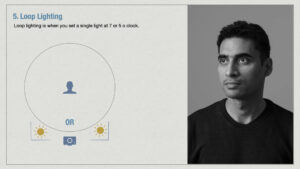
Loop lighting is when you place the main light just above eye level at about 5 or 7 on the clock.
How you recognise this light? It creates subtle shadows on one side and is fairly pleasing for most people. To me it looks like a little more open version of Rembrandt Light.
Use: It works well on all kinds of faces.
Resources:
If you are a beginner you can try these setups at home with your mobile and a table lamp.
The result might be very contrasty but fundamentals remains the same.
And if you are photographer and looking to learn more about lights, you would need below resources
- A Camera
- A strobe light or a speed light or video light can work too
- A Camera Transmitter
- A diffuser to soften the light.
- Good to have a stable tripod for light and camera
- A reflector
- And ofcourse a model 🙂
Conclusion:
Learning how these light behaves on different faces is really interesting. The first step for good portraiture is knowing how light behaves at different positions and second important thing to know is what our client likes or dislikes. How comfortable they are with their imperfections and textures.
My clients who are mostly women and are looking for personal branding, just simply love butterfly. To know what personal branding can do, learn more from the best digital marketer of India.
Let me know if you tried these lights and which one is your favourite?